Sunday, 31 October 2010

Nanowrimo - write a novel in November

Insanity obviously runs in my family!  Or so people think - but they're wrong!

For the last few years my daughter has participated in Nanowrimo, which stands for National Novel Writing Month - you do what it says on the tin in the title, write a novel of a minimum of 50,000 words in the month of November.  30 days of dedicated novel writing, strictly no more than 30, entries submitted after the 30th November won't count.

I've longed to join in, but was afraid to complicate my aging brain by writing a long novel whilst concentrating on my degree work.  However, since I'm taking a year out before I start my PhD, I'm going to give it a go this year, so, beginning tomorrow, I shall be striving to write going on for 2000 words a day so that by the end of the month I shall have achieved my 50,000 wordcount.

It'll be different, they suggest no revising and editing, which is contrary to the way I usually write, but hey, it's going to be fun and different.  Cross your fingers and toes for me and wish me luck!

Halloween, Wheat-free Pumpkin and carrot cake

I was determined not to waste the pumpkin flesh from my Halloween lantern, and a sweet cake appealed to me for a change.  I found a recipe for a simple to make pumpkin cake which I tweaked and converted to gluten-free and vegan.

375g grated pumpkin
225g gluten free flour
1tsp baking powder
1 tsp ground cinnamon
1 tsp freshly ground nutmeg
2 tsp Ener g egg replacer
4 tblps cold water
1 tblsp silken tofu
250 ml sunflower oil
200g sugar
1tsp vanilla extract

2 tblsp raw porridge oats


Place the flour, baking powder, spices and grated pumpkin into a large bowl and stir together.  The keen eyed amongst you will have spotted that I've used pumpkin and carrot because I didn't bother to weigh the pumpkin flesh I'd grated and simply assumed a bowlful would be sufficient.  It wasn't.  So, I figured that since carrot cake tastes good, I'd make up the weight with grated carrot.  Mea culpa:(

When you've stirred it all together it looks pretty boring, but I'm optimistic, so persevered!
In another bowl combine the sugar and oil.  Whip the egg replacer and water until it's starting to thicken, then stir the silken tofu in and combine well (or, if you're not vegan, you simply use 2 eggs!). 

Stir the wet mix into the dry and combine until evenly mixed.I looked at it and decided it looked far too oily, so added the oats to absorb it, this wasn't part of the original recipe. 
I thought the mixture looked quite unpleasant, like raw sausage meat, but, as I said, I'm an optimist.

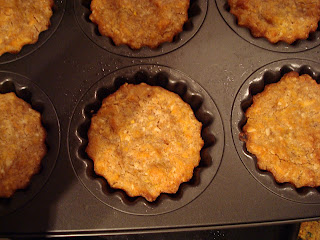
Spoon the mixture into lined patty tins, I had enough for this tray of 6 plus a small rectangular cake tin, too.  Bake in an oven preheated to 180C, gas 4, 350F, for about 20-25 mins until golden brown, as you can see below.

They looked lovely, and tasted delicious, but, for my taste they were still too oily.  I shall make them again but substitute margarine for the oil, which should solve the problem.

If you try them, let me know what you think:)

Halloween! Pumpkin four ways - yes, four!!

It's that time of year again when the streets are full of children wearing skeletons or witch's garb, and I go out and buy sweets so that when they knock on the door I have something to offer them:-)

I bought my pumpkin to hack amateurishly carve into a face to sit in the window so that the children know they won't be ignored.  I planned to make soup and cake with the pumpkin flesh, and roast the delicious, nutritious seeds.  I'm going to split this into three blog pages so that you don't have one humongous blog to wade through - see how I care about you all?  Here's what I did:

Cut a lid from the pumpkin, scooped out all the seeds and pulp.  Set the seeds aside, soaking in some water so they'd be easy to clean.


I found the easiest way to take the flesh from the inside of the pumpkin was to use my apple corer.  I put the flesh into a pan as I went along ready for the soup.

When I'd removed most of the inside, leaving a firm shell, I took a large, sharp knife and cut out a couple of triangles for eyes, used the apple corer to give a "button nose", then a simple crescent for a smile - I'm not into spooky faces, just a simple, happy pumpkin for my callers:-)

Tuesday, 19 October 2010

Christmas card from "freebies" number three

For the third mouse card I decided to make a square design.  I took my basic A5 piece of white card, but folded it a third of the way in, to give me a square card with only half a front.  You’ll see why at the end, it’s really not madness, honest!  I trimmed a quarter of an inch from the base of the card and it now fits into some square envelopes which I bought ages ago in a sale.


So here we are again with our mouse decoupage


and the matching backing paper, which I decided I really had to use at least once!


I covered the inside of the card, and the half front with the backing paper, ensuring that both sheets were the same way up.  It took one and a half sheets of the backing paper.

I matted the main mouse image on to the pale green to make the topper as before, predictably I suppose, but I really do think it sits well on the green.  I used foam pads to fix the star and candy canes, but opted not to use the spare apples and gifts. 

Nor did I use the matching greeting.  Instead I took a simple gold "confetti" phrase of "Merry Xmas", which I placed at an angle across the top left.  I took three tiny gold "confetti" stars and placed them on the tree with tiny dabs of PVA glue.  I didn't use any glitter glue this time - with all that busy background I wanted to keep the topper relatively simple and understated.  I was surprised at how much I actually liked the backing paper once I was using it!

I've propped open the card so that you can see the way the topper is fixed only at the left so that the other half overhangs the main body of the card for a totally different look - do be careful to place your foam pads or glue on the RIGHT hand side of the reverse of the topper - I admit I've applied them to the "wrong" side before now!!!  It's not the end of the world if you do, simply put foam pads on  the remaining side and use that topper on a full card later, and make a new topper for your original card, but it is mega frustrating!!!

So, there  you are, three quite different cards from one "freebie" decoupage design.  Do you have a preference?  amd why that one?

Monday, 18 October 2010

Christmas card from "freebies" number two

This card is similar to the first, well, it would be, using the same decoupage sheet, I suppose!!  Here it is again, to remind you of the raw material, so to speak.


I’ve matted the pink design on to green again as I think this really works well, and repeated the use of an A6 white card blank.  The dark green is the envelope.


I've placed the presents in more or less the same place as it seems logical, same with the greeting.

the candy canes I've applied with sticky fixers to add some depth, and one overhangs the base of the tree as that's what happens in "real life" isn't it?  I've also used a foam pad to elevate the star this time, which I think is an improvement.  I've repeated the use of the glitter glue on apples, garland and star - just a hint though, not too much as these are subtle, chalky colours and I don't want to overpower them.

The spare apples for the tree I have cut out as a block, and matted this on to the same pale green backing.  I've mounted this new topper at the top left which gives a very different feel to yesterday's card, in my opinion - what do you think?

Sunday, 17 October 2010

Making Christmas Cards from "freebies"

I bought issue 84 of Cardmaking and Papercraft because I quite liked the look of the “freebie” on the front – a square wad of Chritmassy papers with cute designs.  I’m quite a traditionalist, really, loving the rich red, gold and deep greens of the season, but I realise that not everyone has the same tastes, and these looked quite subtle, so I thought “Why not?” and bought it.


There are three papers of each design comprising three decoupage topper sheets followed by three co-ordinating backing papers.  I thought you might find it interesting to see what I made with just four of the papers, so I'll show you design one a day and you can tell me which you prefer, if any, and why.


I decided to give this cute little mouse an airing first of all - she reminds me that it's almost time to start decorating.  I don't put up a tree any longer, but when Rachel was small we always erected the tree on December 1st so that we had 24 days as a run up to Christmas, then after Christmas day we began the countdown to her birthday which is quite soon afterwards.


This is the backing paper which accompanies her page, the apples echo those she'd decorating the tree with, but the orange seems a little harsh in tone to me, so I decided simply to stick to the decoupage sheet.  I decided to matt her onto a pale green paper to compliment the tree, and this went on to a plain white A6 card blank.  I cut out the greeting and matted that in the same way.

I cut out each of the accompanying pieces and arranged them as you can see, the gifts look good on the floor beside the tree, and you can see I've deliberately overlapped the frame; I used deep foam pads for this.  I used foam pads to stick one of the apples on the tree, one ready for her to pick up at her feet, and the other has rolled away, as round things often do!  The star and candy canes I stuck down with paper glue.

I placed the greeting centrally, overlapping the base of the main matting to break up the design a little more.

I thought the top left looked a little bare, so found some pearly pink "gems" and stuck them down with some red glitter glue for some extra 'oomph'.  I used a little of the same glue to highlight the apples.  I took some gold glitter glue and traced over the garland on the tree and the star.

So there you are, my first card using some of the "freebie" stash.  I'll show you another tomorrow.

Thursday, 7 October 2010

Wheat-free apple cake with no added sugar- use those windfall apples!

So, back to the apples!  Occasionally I enjoy a slice of cake;  I don't mean an airy-fairy gateau, which is fine to end a meal, but a slice of good, wholesome cake to enjoy with a cup of tea or coffee.  It has to be a slice of something which will be simple to eat, no cake forks necessary, and satisfying - there must be some substance to it - something to get my teeth into and enjoy.

This apple cake ticks all the boxes, and, importantly at the moment, it utilises some of those apples.  Windfalls, or those mis-shapen ones are ideal as they're going to be grated.

You'll need:
200g flour, I used barley, but to make it gluten free choose your own favourite flour(s) - maybe rice and potato, or gram and soya 
half a teaspoon each of cinnamon and mixed spice - to taste
half a teaspoon of bicarbonate of soda
100g margarine
275g mixed dried fruit, I used raisins, sultanas and chopped dates
230g coarsely grated cooking apples (eating apples will give a sweeter cake, and the texture will be slightly different)
2 tsps of egg replacer made up with 4 tblsps of water or fruit juice

Rub the fat into the sifted flour, spices and bicarb until it's like breadcrumbs.
Coarsely grate the apple; I leave the skins on mine as they're organic, but you can peel yours if you like.  The weight given is of the grated apple, which, in my case, equated to two large and two medium windfall apples once I'd cut off the bruised and battered sections!
Mix the fruits into the dry mixture, then bind with the egg replacer liquid.  Turn into an 8" lined cake tin and bake in a moderate oven, 175C in my fan oven, 180C, 350F or gas mark 4 otherwise.
 Bake for about an hour and a quarter, more or less depending on your oven, the flour used etc.  Test with a warmed skewer inserted in the centre - it it comes out clean, it's done:-)  If not, give it a further quarter of an hour and test again.  It should be a lovely golden brown - rather like the splendid one below, which has been allowed to cool completely before slicing.
Many fruit cake recipes tell you to shake your dried fruit with flour to avoid the problem of all the fruit sinking to the bottom of the cake, but, as you can see, it's certainly not necessary in this recipe.

Now, time to put the kettle on, I think:-)

Wednesday, 6 October 2010

Apples, again! Make your own mincemeat for Christmas mince pies :-)

We love Christmas cake, mince pies, Christmas pudings and anything full of fruits, so tasty:-)

Another good use for the windfall apples, and less than pretty ones, is to make your own mincemeat - ready for baking those mince pies that will permeate the whole house with heady scents of fruit and spices.

This is another really simple recipe, so you have no excuse not to try it.

I took:

400g grated cooking apples
100g margarine
300g raisins
300g sultanas
300g chopped dates
200g unrefined sugar
half a teaspoon each of cinnamon, mixed spice, nutmeg and cumin
2 lemons, zest and juice
4 tblsps fresh orange juice

60ml brandy

 
Toss everything, except the brandy, into a large ovenproof dish and stir thoroughly. I use a dessert spoon to measure out the margarine, and you don't need try to break it down into tiny pieces, it's going to melt to make your life easier!

grated zest

dried fruit

I grated the apple straight onto the lemon zest and juice


I used a spoon to measure out the margarine

roughly stir everything together
Place in the centre of an oven pre-heated to 115C for a fan oven, 120C, 250F or gas mark 1/2 for half an hour. Remove from the oven and give it a really good stir to mix everything. The margarine should be very soft and creamy now, and stirring well helps to coat everything with a fine coating of fat which helps it to keep.
place back in the oven

Replace in the oven for a further half an hour, then remove, stir again and allow to cool before adding in the brandy. Stir again then decant into containers and store in the fridge.


after an hour it will look like this

when it's cool, stir in the brandy
I admit to enjoying a spoonful in with my fruit smoothies at breakfast sometimes, on those grey, rainy days when I feel the need for more "comfort" food :-)


DIY project, renovating a huge old school cupboard

Over the years I have bought a few items of old school furniture from the 1950s.  Solid, wooden cupboards designed to withstand the heavy use in a school environment, disposed of by the schools as being out-dated, to be replaced with MDF or chipboard furniture which just doesn't stand the test of time.

This large specimen has been used as an overflow larder in the guest room, in fact my daughter used to refer to sleeping in the pantry when she came to stay!  It stands 7' tall, is 5' wide and 18" deep - like I said, it's large!  It was covered in several coats of paint, which all needed to be removed to reveal the wood beneath in order to transform it into an object of beauty, rather than simply a functional item.

The renovation project is now underway.  It's taking a long time to do, burning off paint, then using chemicals to remove that paint stuck in the fiddly places.  David has removed the cornices and other trim where necessary to clean away paint that had built up in the joints, hence the apparent crenellations on the top!


 The bright blue is particularly fetching, don't you think?  this is at the base of the unit.
 I took the doors outside on a sunny day to burn off the vibrant yellow - isn't the wood a glorious sight, unseen for decades!


This is part of the side of the unit having been sanded, by hand.  Still more work to do though - watch this space!

Apples everywere!!

Well, ok, that's a bit of an exaggeration, but for my small garden, I have harvested many pounds of organic apples.

It's a perennial problem, isn't it, what to do with them all?  I was impressed that a couple of schools have joined together in an attempt to avoid the inevitable waste of fruit, by encouraging parents, neighbours etc to donate their unwanted apples to the schools, who will press the fruit to produce fresh juice for the children.  A great idea - I hope lots of people take them up on it.

One of my favourite ways of using my apples is stuffing them and baking them.  You'll need an apple per person and a jar of mincemeat for the simple version.

Wash the apples well, I use a soft vegetable brush to ensure they're really clean.  Take out the cores; I use an apple corer - you can see how neatly it does it above.  Take a sharp knife and score around the centre of each apple - this enables the apples to rise and avoids the mess of exploding apples!


Arrange the apples in an ovenproof baking dish, and fill each cavity with mincemeat.

Bake the apples in a moderate oven until they have softened, this will take about half an hour or so, depending on your oven and the size of the apples.  Can you see how the skins have parted where I scored them, allowing the apples to sort of souffle up?  The apples will produce a little sauce as they give up some juice which mixes with the mincemeat.  Delicious:-)

If you don't have mincemeat in the cupboard, you can stuff them with any dried fruit to hand.  If you have a really sweet tooth, you might feel the need to drizzle a little maple syrup into the cavity, or some unrefined sugar.  You could also add some chopped nuts for a little "bite". 

I serve mine naked, or simply with a dollop of yoghurt, David enjoys his with custard.  You might like your with ice cream - but whatever topping you choose, I hope you enjoy them.


Sunday, 3 October 2010

Time to bake the Christmas cake!

I don't know about you, but I like to bake my Christmas cake at this time of year so that it has time to mature; I find the flavours mellow and blend together.  I also "feed" it by pricking the surface and pouring over a tablespoon or so of brandy every few weeks.

So, line a 9" cake tin ( I use pre-shaped paper cases that I bought in a catering shop that was closing down!), and bake my wheat free, vegan Christmas cake:

500g mixed dried fruit, I used sultanas, raisins, candied peel

125g chopped dates
25g glace cherries, chopped
4 fruit tea bags, I used mandarin and ginger
500ml boiling water
125g margarine
80g unrefined sugar
1½ tblsp molasses (45ml)
250g barley flour (or any other you choose)
125ml fruit soaking liquid
3 tblsp mixed spice

Put the dried fruit, except the cherries, into a container with the tea bags, pour over the boiling water.  Stir and leave overnight to soak.  This will ensure your cake is moist as the fruit won't be leaching up the liquid in the cake mix.
Drain off the liquid and put to one side, above you can see the plumped up fruit - compare that to what your looks like in the packet, and you'll see why it's worthwhile soaking the fruit!
Beat the margarine and sugar together, then add the molasses, soaking liquid and spice.  Sieve the flour on top.

 Stir the flour in carefully until it's well blended.

 Add the soaked fruit and the chopped glace cherries, they are usually so moist that they don't need soaking.
 Mix the fruit in so that it's evenly distributed.
 Spoon into the lined tin and level off.  This cake has no raising agents, you will have noticed, so it's not going to rise.  Bake for about 3 hours at 145C in a fan oven, about 150C, 300F or gas mark 2 if you don't have a fan oven.  Test with a skewer, and if it comes out clean, it's done, if some mixture is sticking to the skewer, give it another fifteen minutes then try again.  At this temperature it's unlikely to burn, so don't worry!
 It should look something like this when it's baked:-)  I didn't cover my cake, although many people do - I don't find it's necessary.
It's simple to make, tastes great, so what are you waiting for?